I have been deliberating for some time whether to stick with NUnit or go for MSTest.
http://vikasnetdev.blogspot.com/2006/07/eight-point-checks-for-servicing.html
Advantages of MSTest over NUnit
1. Excellent IDE Integration
2. Code Generation
3. New Attributes
4. Enhancements to the Assert class
5. Built-in Support for testing non-public memembers.
After hearing from the colleague that debugging NUnit tests is not working great with Visual Studio 2005, I decided to plunge into MSTest. First step is figure out how move previous NUnit tests to MSTest. Here are steps
Step 1: Start with James NewKirk’s blog post
Step 2: Download the NUnit Converter V1.0 RC1 from workspace
Step 3: Install the Guidance Automation Extensions & Toolkits from link
Step 4:Double-click the file: “NUnit Converter.msi” to install the converter. One caveat: It has not been tested in any other directory than the default directory. This of course does not mean it will not work in a different directory it just means that it might not. Also the rest of the instructions assume you have put it in the default directory. You can think of this as a strong hint to leave it in the default directory.
Step 5: Start Visual Studio 2005 Team System.
Step 6: Open a solution file that has existing NUnit test code.
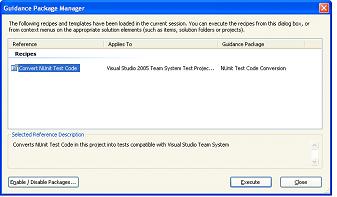
On the Tools menu, click Guidance Package Manager. A dialog box should open, see below. You should check to make sure that the “Convert NUnit Test Code” Recipe is present. Then click Close.
Step 7: You have completed the installation.
Step 8: Back-up the files and their associated project and solution files. This step is critically important. There is no automated restore of your files back to a previous state.
Step 9:Start Visual Studio 2005 Team System.
On the File menu, navigate to Open, click Project/Solution. Navigate to the directory where the Project/Solution is contained and then select the file you wish to open.
On the File menu, navigate to New, click Project. Select the appropriate (C# or VB.NET) test project and place it in the directory of your choosing. See “Tests must be in a Test Project” below.
Copy each file that contains NUnit test code that you want to be converted into the test project.
Add any required references (including a reference to NUnit) and compile the test project. Once the code compiles, run the tests in NUnit to ensure that you are starting with a working test harness. This step is optional but I like to do it because if the conversion process introduces problems, I know that I started with a working baseline.
Step 10: Now onto the conversion process. Right-Click the test project that you created in previous step in the Solution Explorer. Click the Convert NUnit Test Code. As each file is being converted it will be opened in Visual Studio. When the conversion is complete, the conversion results will be displayed.
Once you have completed the conversion process you should disable the guidance package. The reason is that every time you right-click in the Solution View the guidance package looks for NUnit test code. If there isn’t any to find it just wastes time. On the Tools menu, click Guidance Package Manager. A dialog box should open. Click Enable/Disable Packages. You should uncheck “NUnit Test Code Conversion”. Then click OK.
No comments:
Post a Comment